Do-it-Yourself Christmas Crafts
This year get creative with the holidays and get crafty! Try decorating your tree with homemade ornaments, make your own decorations to hang on your door, hang your holiday cards through your doorway, and create your own tree topper. Check out these great ideas for a Do-It-Yourself (DIY) Holiday!

PhotoCredit | DepositPhotos | StephanieFrey
String Popcorn
What you will need: Popped Popcorn, Cranberries, Needle & Thread
Stringing popcorn is actually quite easy but time consuming. Make sure your popcorn is popped and your cranberries are in a bowl and ready to be used.
Thread your needle and poke it through one cranberry, then tie a knot to make an anchor. Then carefully thread popcorn and cranberries with as many or as little as you would like. Just make sure they are spaced apart evenly.
This is a wonderful way to sit down with family and friends and do something creative, and have time to talk and enjoy their company.
Christmas Card Decorations

PhotoCredit | DepositPhotos | monkeybusiness
What you will need: Christmas Cards, Tape, & String
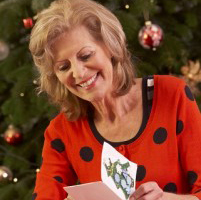
Most people send Christmas cards and a lot of people today are sending family photos, engagement, wedding and their grandkids pictures on their cards.
Try taping them on the door to share with all of your senior living friends. You can tape them on the doorway or take a piece of string and you can hang them along the string through the doorway.
These are great for decorating too! Save them after the holidays and you can re-use them next year as well.
Grandbaby’s First Christmas – Ornament & Wreath
What you will need:

PhotoCredit | Vanessa Beaty
For the Ornament: Ornament, Glue, Glitter & Sharpie
For the Wreath: Paper, Markers, Scissors & Red Ribbon
Be creative this year with your grandbaby’s first Christmas. Don’t buy an ornament with the date and “Baby’s 1st Christmas” instead, make a Christmas wreath out of your grandbaby’s hand prints!
Use heavy paper so that it lasts. Cut out each hand print and connect them in the form of a wreath and then write the date and add a bow. It’s easy! For the ornament, buy a solid color ornament, silver is a great idea.
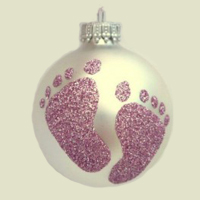
Put the baby’s foot in glue and stick it on the ornament and then add glitter. And don’t forget to add the date! You will remember it every year you bring out the decorations.
DIY Holiday Tree Toppers
 You can easily make a tree topper using common materials found at home, and create something that is both functional and sentimental. We just made this at home this year to go with our new holiday tree! Also, since you are making this for yourself and your family, you can make this a denominational piece (e.g. – Christmas, Hanukkah, Kwanza, etc.) or not at all, it’s totally up to you.
Since this craft is a little more complex, ask your friends to join you or talk to your senior living manager and see if this can be a craft for the community and you can all work together.
Materials Needed:
• Cardboard Roll from Paper Towel
• Colorful/Decorative Ribbons
• Aluminum Foil
• Glue
• Tape
• Stapler
• Piece of Cardboard (roughly 6×6”) or other
• Scissors
• Any kind of decorative beads or sprinkles, etc
Start off by taking the paper towel roll and cutting off the top 2”, then staple the top opening across so that it’s closed; this will become the very top!
Next Take out some ribbon and cut a few portions so that they reach around the roll one time. This is a part where you can be creative, so you can mix/match the ribbons, stack them one on top of the other, do whatever you like here!
Take the glue and the ribbons and start to cover up the whole paper towel roll, working all the way up towards the top. You may have to cut a smaller piece of ribbon to fit over the very top, and you’ll that as you progress. Stand the roll up on a table and let the glue dry for a bit, now we can work on the very top!
With this piece, you can use the cardboard to make any number of objects that can sit on top of your tree; this could be an Angel, a Star of David, or a Snowflake – Be Creative! If you wanted to, you can print out a picture or another image from the internet, and mount it on the cardboard! Express yourself!
Whatever you decide, this is where you can use the Aluminum Foil to cover the cardboard, if that fits your design. You can also use the decorative beads, and other elements to make this pop, and again you can do whatever you want here, this is YOUR tree topper.
After you’re done with the Angel, Star, or Snowflake… and that too has dried and all the of decorative pieces are set in place, now you can carefully glue and/or tape this part to the transformed paper towel roll, and together they should look more like a holiday tree topper! Make sure it’s staying on, don’t be afraid to use the stapler to attach the front part to the tube, but if you do, make sure the small part of the stapler is IN the tube so you can staple it without crushing the tube closed. Look at it before you staple, you’ll get it.
The last thing to do here is to give this to the youngest grandchild when they visit, pick them up and have them place it over the top branch of the tree. Voila! Take a picture!
Happy Holidays from Moves for Seniors!
Send us your holiday do-it-yourself decorations & crafts and we’d love to share it!
And for all of your moving and shipping needs, call Moves for Seniors. Moves for Seniors specializes in moving seniors. We will set you up with a Specialty Move Coordinator and provide you with a senior moving checklist.
Call us today at (800) 227-0515 or click here for a free quote.